
Using Unity with Playroom Kit
The Unity SDK currently only supports Unity Web. This is an experimental technology.
Unity is the most popular game engine, it’s also a great way to make web games thanks to the WebGL export option.
Playroom Kit complements Unity by simplifying the development of multiplayer games and interactive web-based applications.
Getting started
Video Tutorial
1. Install the SDK
- Download
playroomkit.unitypackagefrom the releases page (downloadplayroomkit.unitypackagefile). - Drag the package into your Unity project and import all files.
- Open terminal, navigate to your project directory, and run:
cd Assets/Playroom Kit
npm install
This will install the required dependencies for the SDK.
2. Initialize Playroom Kit
Initialize a Playroom Kit instance. We recommend initializing it in a Singleton and reusing it across your game.
Then, in your game’s Start method, call InsertCoin:
using Playroom;

// ...
private Playroom Kit _playroomKit = new();
// ...

void Start() {
    _playroomKit.InsertCoin(new InitOptions()
    {
        maxPlayersPerRoom = 2,
        defaultPlayerStates = new() {
            {"score", 0},
        },
    }, () => {
        // Game launch logic here
    });
}
Now you can use Playroom Kit throughout your game!
3. Manage game state
Use Playroom Kit.SetState and Playroom Kit.GetState to handle game state. These automatically sync with other players.
See the API reference for more information.
4. Exporting to WebGL
To bring your game to the world, you must build! Configure your Build settings to our optimal settings.
- Go to
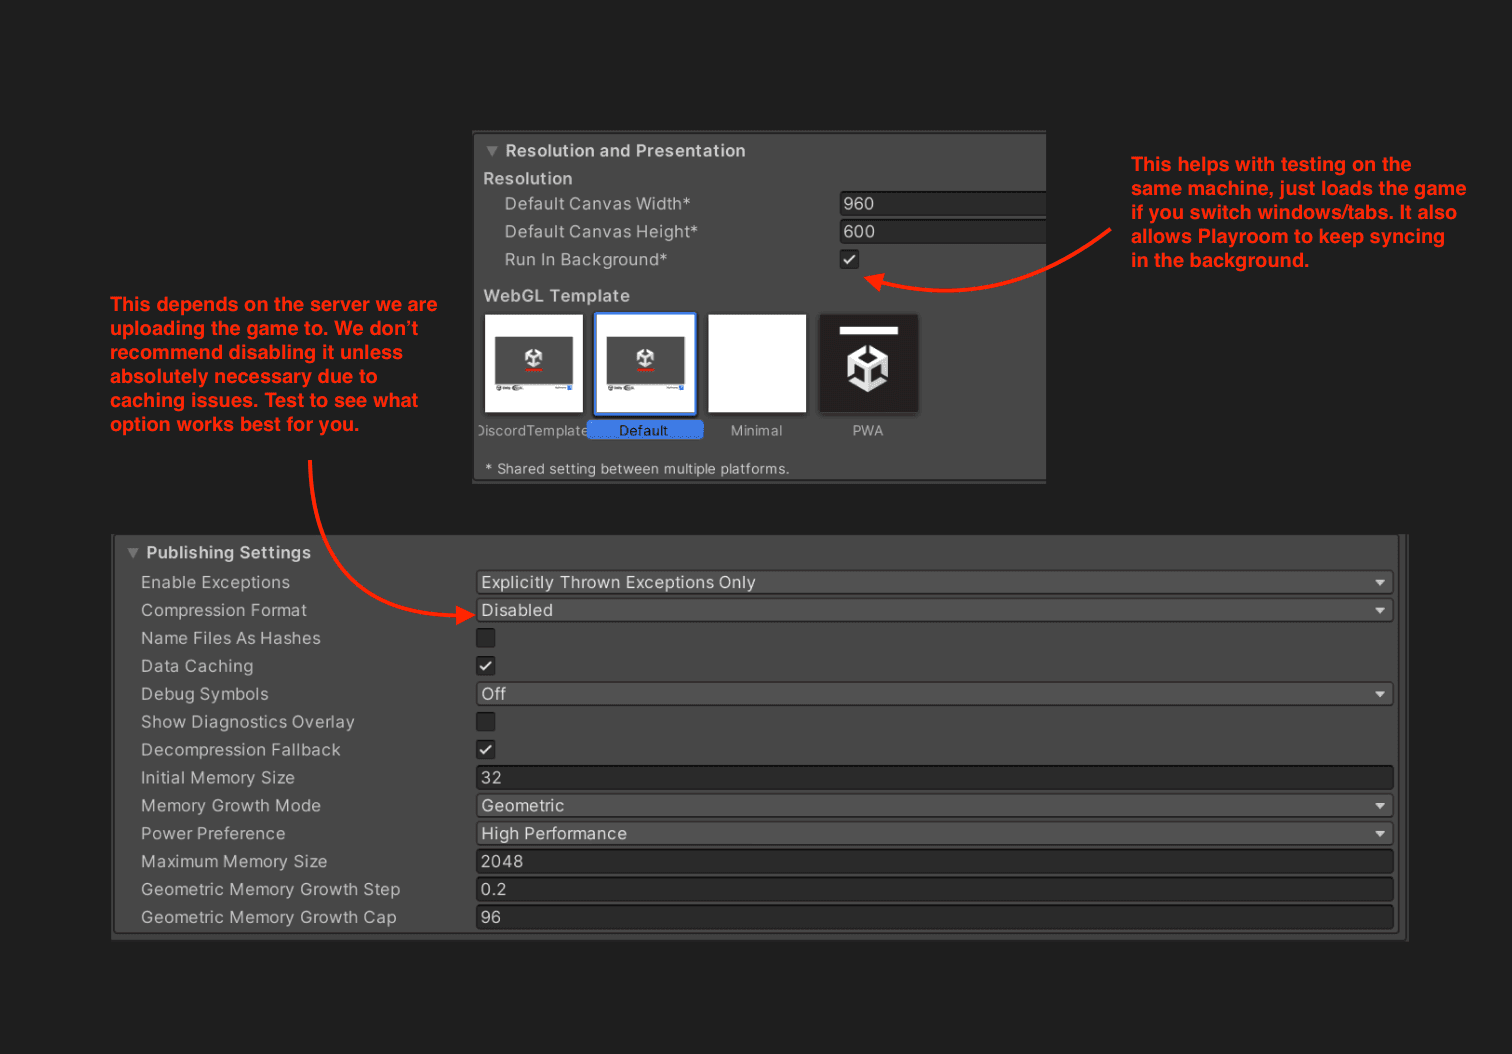
File > Build Settingsand selectWebGLas the platform. - In Player Settings:
- Set
Resolution and Presentation > Run In Backgroundtotrue. - Choose your desired template (Choose DiscordTemplate if you want to publish to Discord Activities).
- Set
Compression FormattoNoneunderPublishing Settings(this is to make sure the build works with the Playroom Portal).
- Set
- Build your game.
- To test the build locally in your browser, run
python -m http.serverin the resultant build folder. We also recommend using Servez, a simple web server solution with a nice interface.
Do note that Playroom Kit for Unity only works with WebGL builds.
Updating from a previous version
Update Playroom Kit for Unity to get the latest features and fixes. We recommend doing the following:
- Ensure your Unity version is above 2019 LTS
- Delete all
node_modulesfolders from your previous installation - Add the latest plugin (See Installation instructions). You must re-run
npm installand get fresh packages.
Testing your games
Playroom Kit for Unity ships with some helpful features to make multiplayer game dev easier.
Playroom Dev Manager
The Playroom Kit for Unity plugin includes a “Playroom Dev Manager” panel for multi-instance testing and ease-of-use, which controls two features:

Video Tutorial
Getting started with the Playroom Dev Manager
Playroom Kit for Unity, when installed in your project, comes with a prefab called PlayroomMockManager. This is available inside the Playroom Kit/Prefabs folder.
Just drag-and-drop it into your scene. It should have two entries.
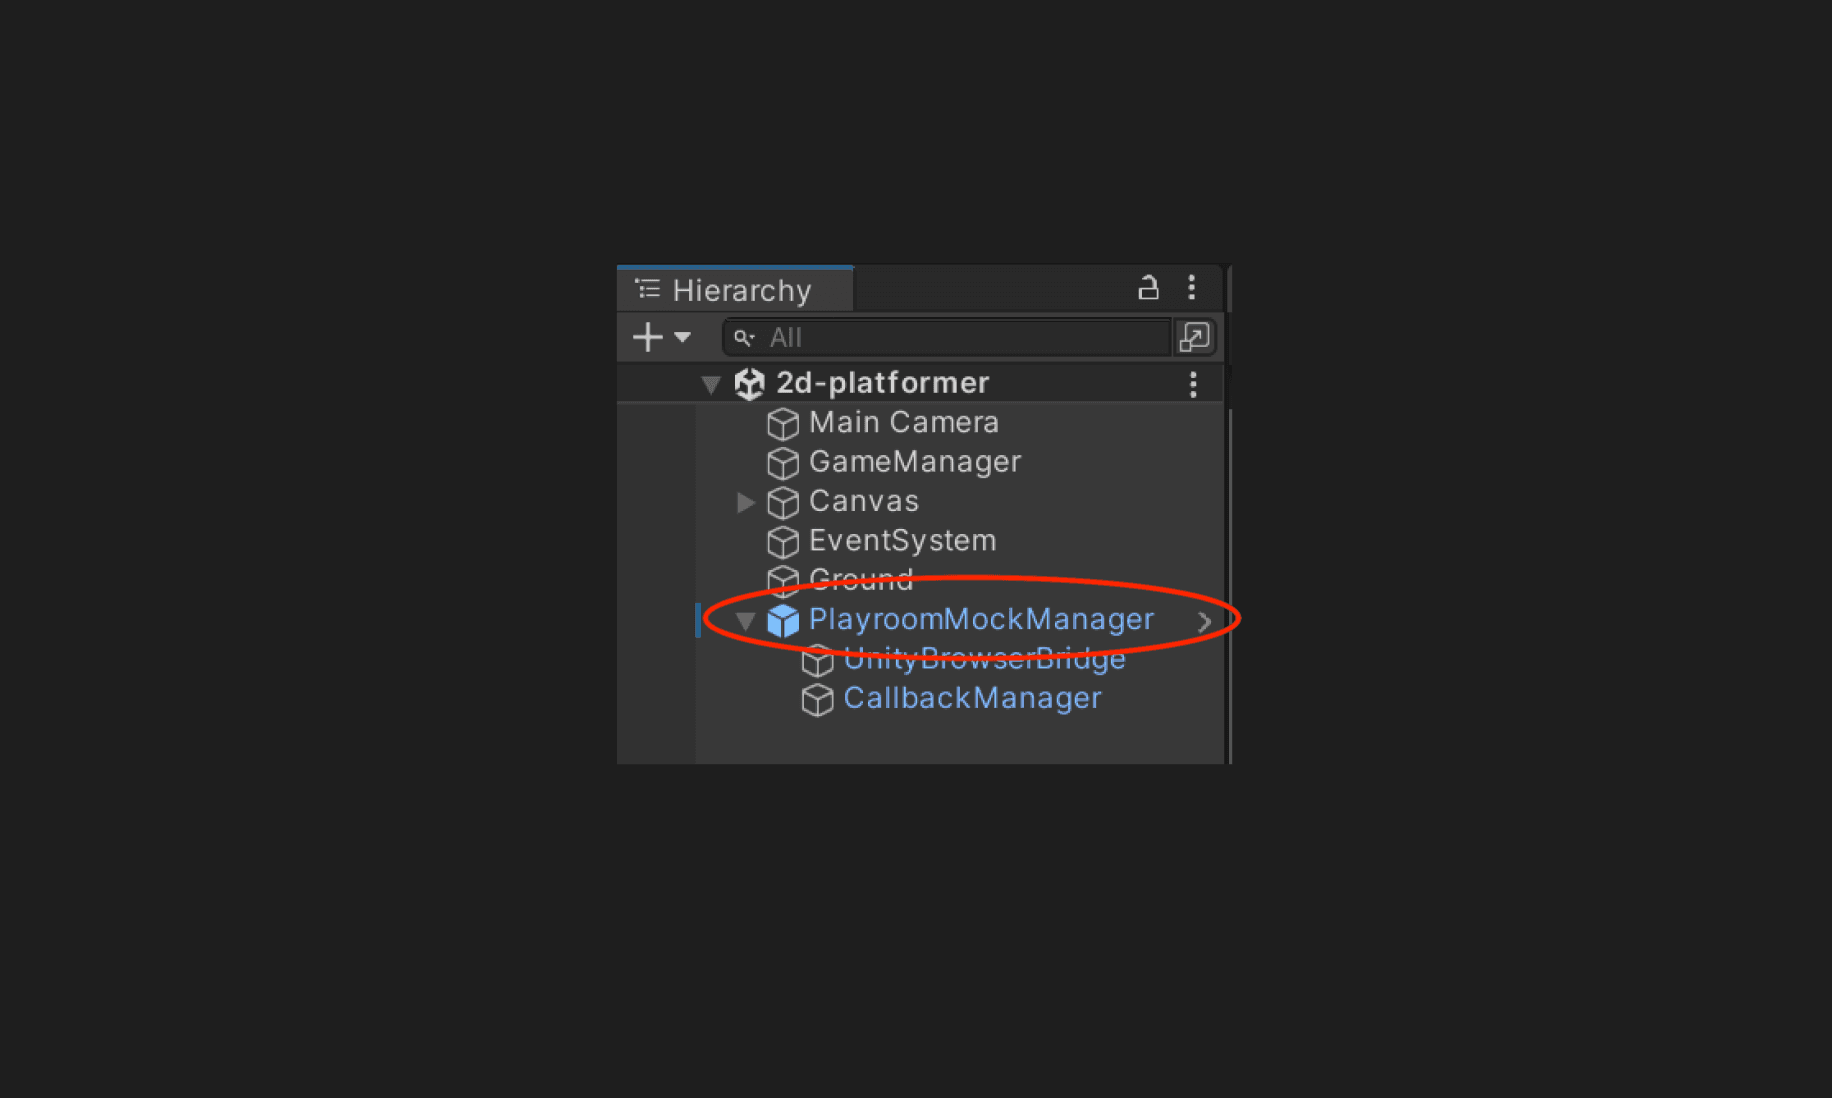
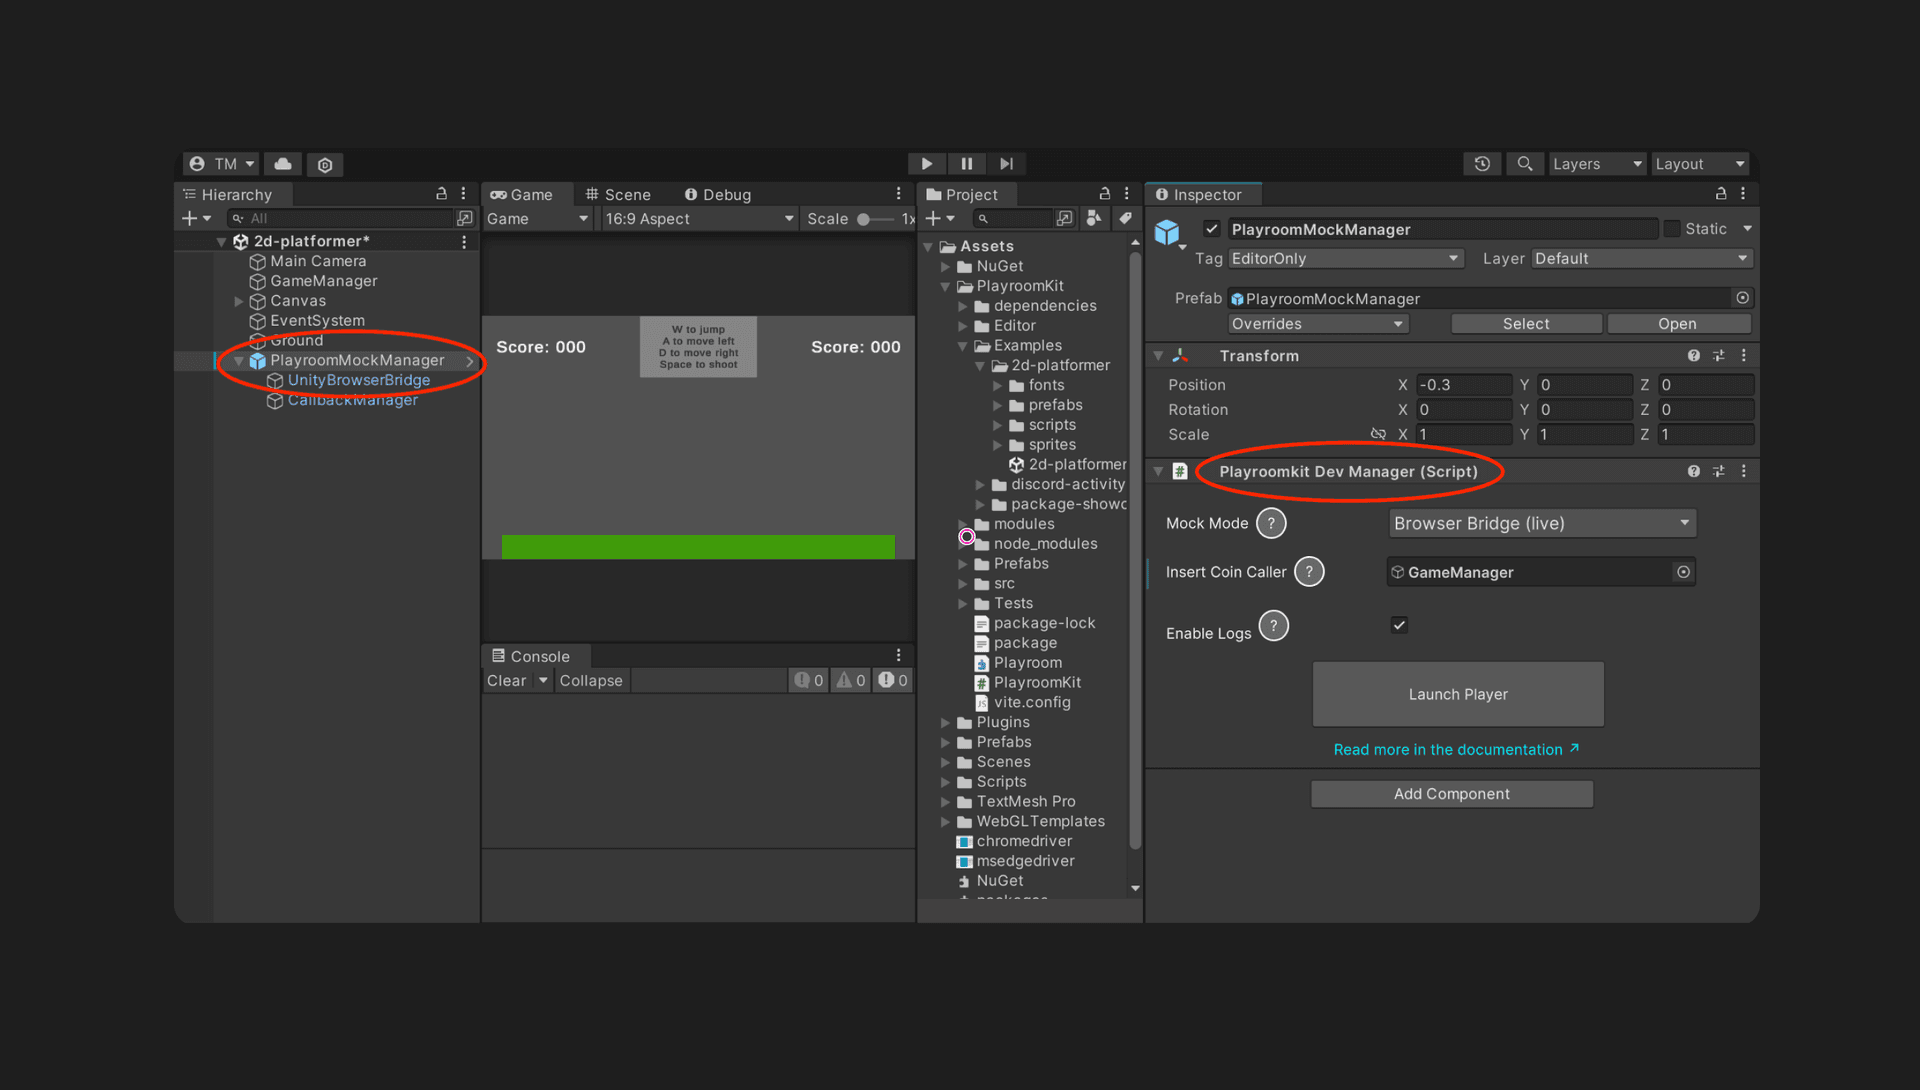
When you select “PlayroomMockManager”, you’ll see the Playroom Dev Manager panel on the right. Here, you can:
- Set the Insert Coin Caller. This is required for Playroom Dev Manager to work correctly. The “Insert Coin Caller” is simply the GameObject where InsertCoin is called in your game.
- Choose your Mock mode. Learn more about it here.
- Launch multiple players. This currently works best with Browser Bridge mock mode. More on it here.
Mock Mode
Since the current SDK only supports Unity Web, we’ve introduced Mock mode - a way to test out your game’s logic in Unity’s Preview mode, without having to build for web every single time.
1. Local (simulated)
The “Local” mock mode doesn’t connect to the actual Playroom servers. Instead, it just mocks the API calls within Unity, and maintains a local state.
The “Local” Mock mode only works in single player mode for now. We aim to make it multiplayer by Q4.
| ✅ Pros | 👎 Cons |
|---|---|
| Super fast | There may be inconsistencies |
| Not much setup, lightweight | Can’t benchmark network load/bandwidth |
| Can work offline | Doesn’t have multiplayer (yet), single-player only |
| No impact on Playroom bill |
2. Browser Bridge (live)
This mode connects to a live, multiplayer Playroom server in the cloud. It will make real network calls, but to do so, it will launch a controlled browser (to run the underlying network calls).
| ✅ Pros | 👎 Cons |
|---|---|
| Live on Playroom servers, testers can join in from live games | Takes time to set up |
| Completely accurate according to production | Network dependent (can’t develop offline) |
| It may eat up your Playroom bill |
Setting up the Browser Bridge mock mode
Follow these steps to set up Browser Bridge mock mode for your project.
Step 1: Enable Browser Bridge Mock Mode
- In the Playroom Dev Manager, locate the “Mock mode” dropdown.
- Select “Browser Bridge (live)” from the available options.
Step 2: Download and Set Up the Chrome Driver
Browser Bridge mock mode requires a Chrome browser to run alongside the Unity Editor. You must install the appropriate ChromeDriver version matching your browser.
- Identify your Chrome version.
- You can check this in your browser settings. Refer to this guide for help.
- Download the corresponding ChromeDriver version from Google’s Chrome for Testing page.
- Place the ChromeDriver in an accessible location on your machine.
Avoid adding the ChromeDriver to version control, as team members may use different browser versions. Each developer should maintain their own compatible version.
Step 3: Configure the Web Driver Path
-
In the Unity project hierarchy, select “UnityBrowserBridge”.
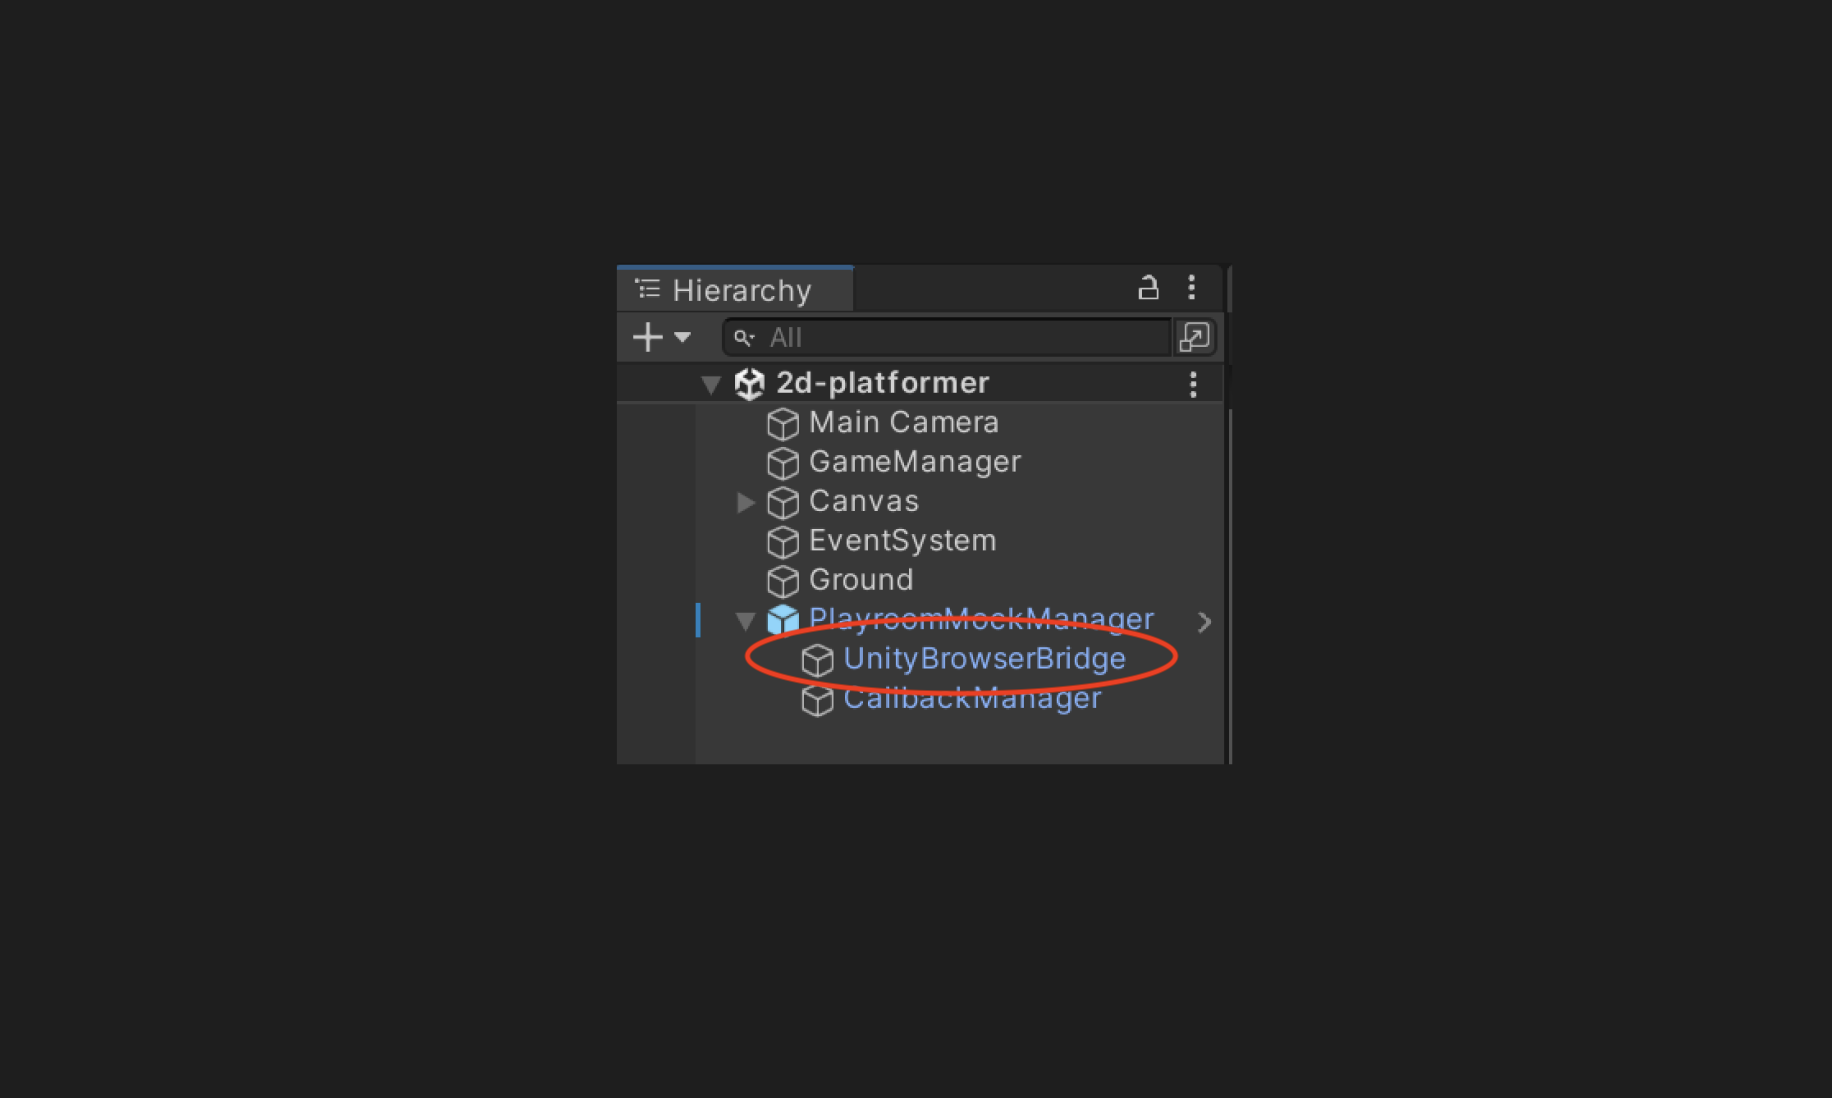
-
In the “Inspector” panel on the right, locate “Unity Browser Bridge (Script)”.
-
Update the “Web Driver Directory” field with the path to your ChromeDriver file.
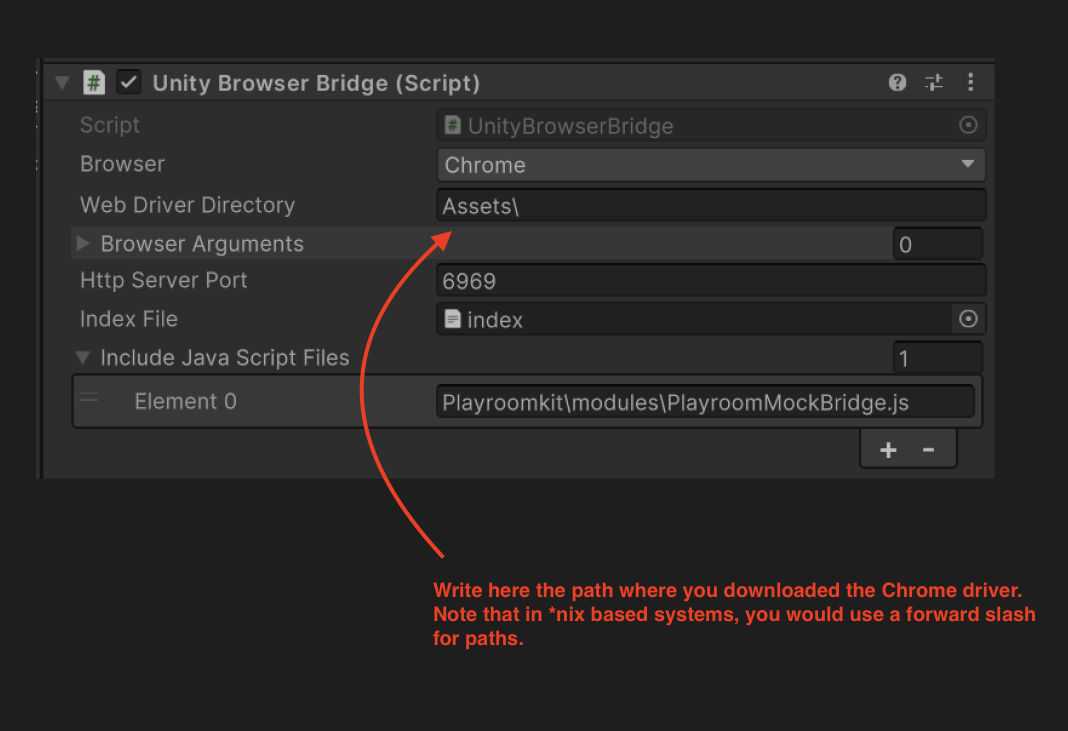
Step 4: Update Paths for *nix Systems (if applicable)
For macOS or Linux, update the “Include JavaScript Files” path in the “Element 0” field with the correct syntax for your system.
Different operating systems use different path separators. Ensure your paths are formatted correctly:
- Windows: Use backslashes (
\)
Example:Playroomkit\modules\PlayroomMockBridge.js - macOS/Linux: Use forward slashes (
/)
Example:Playroomkit/modules/PlayroomMockBridge.js
Still thinking about which mock mode to use? Check out this FAQ answer covering different scenarios and which mock mode goes best for it.
Multiple Player testing
This currently works with Browser Bridge mock mode only.
To test with multiple players:
- Ensure the latest version of the Playroom Kit plugin is installed.
- Open the Playroom Dev Manager panel in Unity.
- Click “Launch player” to create a new Unity Editor instance.
- Repeat step 3 for additional player instances (limited by your computer’s resources).
This feature uses ParrelSync Unity Editor to create multiple Unity Editor clones, each representing a different player.
Tip: Use this method to simulate various multiplayer scenarios and test synchronization between players without deploying your game.
By utilizing both Mock Modes and the Multiple Player testing feature, you can thoroughly test your game’s multiplayer functionality and performance within the Unity environment before proceeding to a full WebGL build.
Examples
Check out some simple and advanced use cases!
Simple Example
Use WASD or Arrow keys to move the player around. The player’s position is synced with other players in real-time.
Code for this example can be found here.
Beanz: Discord Activity Demo
Once built, this demo works on both WebGL in the browser, and in Discord Activities.
Code for this example can be found here.
API Reference
See the API reference for more information.
FAQ
How to display player’s profile picture in Unity?
PlayroomPlayer.GetProfile().photo is formatted as data:image/svg+xml,{svg encoded for url}. In order to display it in Unity:
- Remove
data:image/svg+xmlfrom the string. - Decode the rest using
HttpUtility.UrlDecode() - Display the result into an
SVGImagecomponent.
Warning: Requires Unity’s Vector Graphics package from com.unity.vectorgraphics, which is an experimental package.
 private void LoadSVG(string svgBytes) {
    // Split the string to escape the real data
    svgBytes = svgBytes.Split(",".ToCharArray(), 2)[1];
    // Decode from the URL encoding
    svgBytes = HttpUtility.UrlDecode(svgBytes);
    VectorUtils.TessellationOptions tesselationOptions = new VectorUtils.TessellationOptions();

    using (StringReader reader = new StringReader(svgBytes))
    {
        SVGParser.SceneInfo sceneInfo = SVGParser.ImportSVG(reader);
        tesselationOptions.MaxCordDeviation = float.MaxValue;
        tesselationOptions.MaxTanAngleDeviation = float.MaxValue;
        tesselationOptions.StepDistance = 1f;
        tesselationOptions.SamplingStepSize = 0.1f;

        List<VectorUtils.Geometry> geoms =
        VectorUtils.TessellateScene(sceneInfo.Scene, tesselationOptions);

        // Build a sprite with the tessellated geometry.
        Sprite sprite = VectorUtils.BuildSprite(geoms, 100.0f, VectorUtils.Alignment.Center, Vector2.zero, 128, true);
        sprite.name = "SVGimage";
        profilePicture.sprite = sprite;
    }
}
Thanks to Zy from our Discord for this tip.
How to maintain an array of Players in Unity?
You can manage a list of players in Unity to track their state and perform actions on them simultaneously. Here’s how to use OnPlayerJoin and Player.OnQuit:
object[] players = Array.Empty<object>();

Playroom Kit.OnPlayerJoin((player) => {
  players.push(player);
  player.OnQuit(() => {
    Debug.Log($"{player.id} quit!");
    players = players.Where(p => p != player).ToArray();
  });
});
This is similar to the Playroom Kit JavaScript SDK’s usePlayersList hook.
How to do physics over the network?
1. Is it possible to achieve deterministic physics in Unity for networking?
Deterministic physics in Unity can be quite challenging to achieve due to the nature of the physics engines it uses. Unity uses PhysX for 3D physics and Box2D for 2D physics, both of which are deterministic by themselves. However, achieving determinism in a game involves more than just the physics engine being deterministic. For example, using the Rigidbody component in Unity has a property called Interpolate that affects how visuals are interpolated, which can cause differences between transform.position and rigidbody.position. This can lead to non-deterministic outcomes. For more details, you can check Unity’s documentation on Rigidbody interpolation.
2. What are the conditions required for deterministic physics?
To achieve deterministic physics, all inputs (forces, impulses) must be applied to the same objects at the same time across all clients. Any delay in applying these inputs, even by one timestep, can lead to different results. This means that automatic updates of the physics engine in Unity should be disabled, and you should control these updates manually to ensure consistency. You can learn more about this in Unity’s documentation on Physics.Simulate and the article on Fix Your Timestep by Gaffer On Games.
3. What is floating-point determinism, and why is it important?
Even if you manage to achieve deterministic physics in Unity, floating-point determinism is another hurdle. Different machines with different architectures may calculate floating-point numbers slightly differently, which can cause variations in physics simulations when networking. This can lead to desynchronization across clients. For more information, see the article on Floating Point Determinism by Gaffer On Games.
4. What approach did the developers of Soccer Party use for networking physics?
Given the complexities of achieving deterministic physics, the developers of Soccer Party decided not to rely on it. Instead, they opted to frequently send position and velocity updates for rigid bodies, and even rotation data in some cases. Their focus shifted to optimizing the size and frequency of these messages rather than ensuring deterministic physics. This approach also requires solutions for handling synchronization issues, such as what to do when objects get out of sync, how to avoid these issues, and how to prevent players from noticing them.
These excerpts come from conversations with an active Discord member, GuilhermeAlanJohann.
Which mock mode should I use?
- Start with Local mock mode for:
- Initial project setup
- Testing new features/algorithms
- Rapid iterations
- Progress to Browser Bridge mock mode for:
- Realistic testing scenarios
- Multiplayer functionality
- Network performance evaluation
Remember that both mock modes in the Unity Editor approximate the final WebGL build. Some differences may occur due to the underlying C++ and JS compilation in the web environment.
Aurea NetLayer: a higher level API for Unity
GuilhermeAlanJohann from our Discord community has created a higher level plugin for Unity that makes it easier to use Playroom with Unity.
Features
- Sync position and rotations of objects over the network (supports interpolation)
- Different object authorities (Host and LocalPlayer)
- Spawn/Unspawn objects over the network
- Send Messages to others (including or excluding yourself)
- RPC (…kind of). It uses Unity message system.